Screenshot Studio includes a built-in MCP server (Model Context Protocol) that lets AI coding assistants read and edit your open screenshot documents. Once connected, you can ask Claude Code, Cursor, or Codex to rewrite captions, change background colors, reorder screenshots, or fill in every localization — and watch the changes appear in the app.
This guide covers how to start the server, connect each supported client, verify the connection, and what the assistant can and cannot do once it is in.
What MCP Does in Screenshot Studio #
MCP is an open standard that lets AI tools call functions exposed by other apps. Screenshot Studio runs a small HTTP server on your Mac, bound to localhost only, that exposes your open documents as a set of tools:
- Read project settings, screenshot slots, captions, and the current design
- Import raw screenshots from a folder on your Mac, or drop a single capture into a slot
- Write titles and body text for any locale, and add new App Store languages to the project
- Change the main design or a single screenshot's override: backgrounds, gradients, colors, fonts, frame style, device position, magnifier
- Add, remove, and reorder screenshot slots
- Render a preview so the assistant can see what it just changed
The server works on the free tier. Nothing is uploaded to the cloud — the assistant talks to the app over 127.0.0.1 on your own machine.
Requirements #
- Screenshot Studio for macOS (the MCP server is Mac-only)
- At least one
.screenshotstudiodocument open - An MCP-capable client: Claude Code, Cursor, VS Code, Codex, or Antigravity
Step 1: Start the MCP Server #
-
Open Screenshot Studio and go to Settings → MCP.
-
Click Start Server. The status changes to a green Running indicator.
-
Optionally turn on Auto-start on launch so the server comes up the next time you open the app. This setting only affects future launches, not the current session.
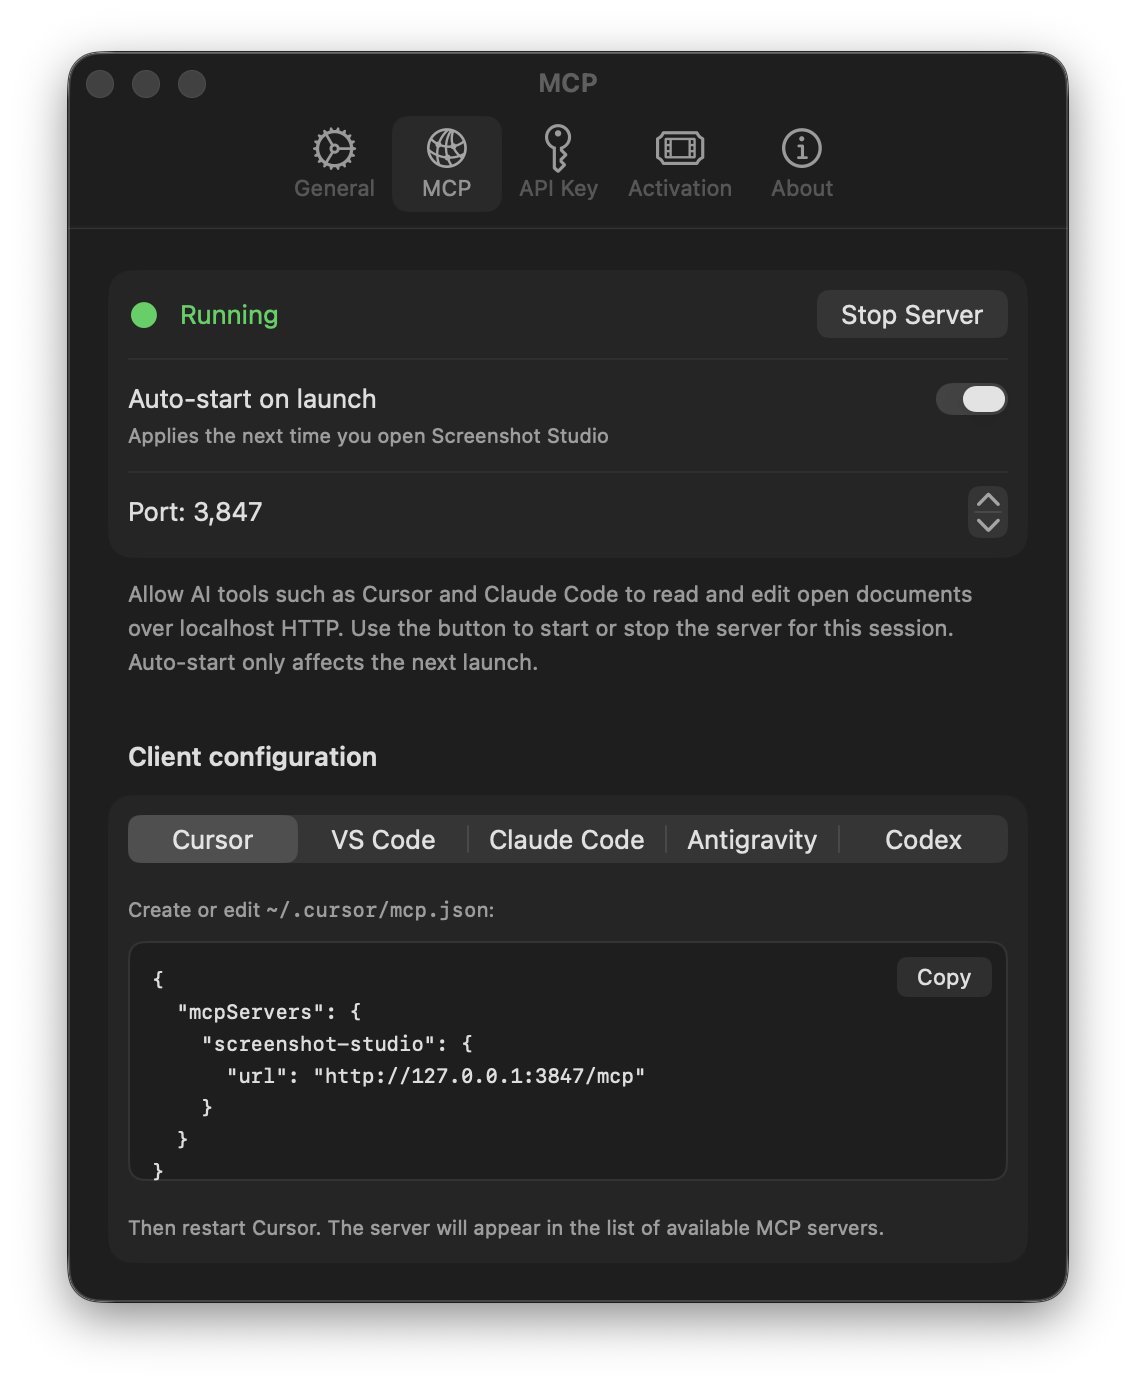
The MCP tab in Screenshot Studio settings: server status and Stop Server button, the auto-start toggle and port, and a Client configuration panel with a ready-made snippet for each AI client.
Everything you need is on this one pane: the status and start/stop button at the top, the port below it, and Client configuration at the bottom with a tab per client and a Copy button for each snippet.
The default endpoint is:
http://127.0.0.1:3847/mcp
If port 3847 is taken by something else, change it with the Port stepper. The server restarts automatically on the new port, and the snippets under Client configuration update with it. Everything below is what those snippets contain, with a little more context.
Step 2: Connect Your Client #
Claude Code #
The fastest route is the CLI. Run this in Terminal:
claude mcp add --scope user --transport http screenshot-studio http://127.0.0.1:3847/mcp--scope user registers the server for every project on your Mac, which is usually what you want. The server belongs to the running app, not to one codebase. Drop the flag to register it for the current project only.
If you prefer a config file, create .mcp.json in your project root instead:
{
  "mcpServers": {
    "screenshot-studio": {
      "type": "http",
      "url": "http://127.0.0.1:3847/mcp"
    }
  }
}
Claude Code expects "type": "http" and "url" at the top level of the server entry, not nested inside a "transport" object.
Verify with:
claude mcp listThen start a new Claude Code session. The screenshot-studio tools appear automatically.
Cursor #
Create or edit ~/.cursor/mcp.json:
{
  "mcpServers": {
    "screenshot-studio": {
      "url": "http://127.0.0.1:3847/mcp"
    }
  }
}
Restart Cursor. The server shows up under Settings → MCP with its tool list. Cursor reconnects on its own when you restart Screenshot Studio, so you do not need to toggle anything in the app.
VS Code #
Run MCP: Open User Configuration from the Command Palette, or create .vscode/mcp.json in your project:
{
  "servers": {
    "screenshot-studio": {
      "type": "http",
      "url": "http://127.0.0.1:3847/mcp"
    }
  }
}
Note the top-level key is servers, not mcpServers. Save the file and VS Code picks up the change without a restart.
Codex #
Run in Terminal:
codex mcp add screenshot-studio --url http://127.0.0.1:3847/mcpOr add to ~/.codex/config.toml (global) or .codex/config.toml (project):
[mcp_servers.screenshot-studio]
url = "http://127.0.0.1:3847/mcp"
enabled = true
Verify with codex mcp list, then start a new Codex session and run /mcp to confirm the tools loaded.
Antigravity #
Open Manage MCP Servers → View raw config, or edit ~/.gemini/antigravity/mcp_config.json:
{
  "mcpServers": {
    "screenshot-studio": {
      "serverUrl": "http://127.0.0.1:3847/mcp"
    }
  }
}
Antigravity uses serverUrl rather than url. Save the file and click Refresh in Manage MCP Servers.
Step 3: Try It #
With a document open in Screenshot Studio and the server running, ask your assistant something like:
List the iPhone screenshots in my open Screenshot Studio document and show me the current titles.
The assistant calls list_documents and list_screenshots and reports back. From there, natural requests work:
- "Import the screenshots from ~/projects/myapp/shots into the iPhone set, in order."
- "Rewrite all six titles to focus on benefits instead of features. Keep them under 30 characters."
- "Switch the main iPhone design to a dark navy to purple gradient with white text."
- "Move screenshot 4 to the first position."
- "Add German and Japanese to the project and fill in their captions for every screenshot based on the English text."
- "Add a magnifier on screenshot 2 zoomed in on the top right corner."
- "Render a preview of screenshot 1 and tell me if the title is readable against the background."
Every change lands in the open document immediately. Save when you are happy with the result, or close without saving to discard the session's edits.
One prompt, a whole set #
You do not have to drive it step by step. Point the assistant at a folder of raw captures and let it work:
Create App Store screenshots in Screenshot Studio from the images in this folder.
In the clip below, that single prompt does the whole job. The assistant reads the folder, spots that the captures cover two platforms, and imports the iPhone and Mac shots into their own sets. Then it writes a caption for every screenshot, samples an accent color from the app's own interface for the design, and calls render_preview between passes to check the layout — tightening body copy that crowded the device, and backing off a scale that clipped the bezels.
Note the last step in particular. Because the assistant can see its own output, it revises rather than guessing — which is the practical difference between an assistant that writes design values and one that produces a design.
Working with Multiple Documents #
If several documents are open, the assistant defaults to the active window. To target another one, it calls list_documents to get each document's ID and passes document_id to the tool it wants to run. It can also call set_active_document to switch windows and bring one to the front.
This means you can keep an iPhone project and an iPad project open side by side and tell the assistant to "apply the same gradient to the iPad document" without clicking around.
What the Assistant Can Change #
| Area | Tools | Notes |
|---|---|---|
| Screenshots | import_screenshots, set_screenshot_image |
Load raw captures from a folder or a single file; images must match a real device resolution |
| Captions | set_text |
Title and body for any locale, no cap |
| Languages | add_language |
Add an App Store locale; every slot gets an empty row to fill |
| Main design | set_design (no index) |
Background, gradient, frame style, fonts, text size, colors, orientation |
| Per-screenshot override | set_design with index |
Colors, device position, scale, alignment, magnifier, hide frame |
| Slots | add_screenshot, remove_screenshot, move_screenshot |
Reorder or restructure the set |
| Reading | get_project_config, get_main_design, get_screenshot, get_screenshot_image |
Inspect before changing |
| Preview | render_preview |
Watermarked, downscaled JPEG for checking the composition |
Screenshots and image backgrounds are set from a file path on your Mac. The assistant cannot push image bytes through MCP, so a capture has to exist on disk before it can be imported. Screenshots you paste into a chat window do not count.
Troubleshooting #
The client says the server is unreachable. Check that Screenshot Studio is open and Settings → MCP shows Running. The server only exists while the app is running. If you closed the app, reopen it and click Start Server, or enable Auto-start on launch.
Tools appear but calls fail with "No document is open".
MCP tools need at least one open document. Open or create a .screenshotstudio file, click its window so it is active, and try again.
The port changed and the client cannot connect. Copy the updated snippet from Client configuration in Settings. The endpoint there always reflects the current port.
Claude Code does not list the server.
Run claude mcp list. If screenshot-studio is missing, check that your .mcp.json uses "type": "http" and "url" at the top level of the entry. Then start a fresh session; running sessions do not pick up new servers.
Cursor shows the server as disconnected after restarting the app. Cursor reconnects on its own within a few seconds. If it does not, toggle the server off and on in Cursor's MCP settings.
Changes are not visible.
Make sure the assistant is targeting the right document. Ask it to run list_documents and confirm which window is marked active.
Importing images fails with a permission error. Screenshot Studio is sandboxed, so it cannot read every path your assistant can. Captures sitting in a protected location such as Desktop, Documents, or Downloads may be refused even though the file is plainly there. Copy them somewhere unprotected and import from that path instead.
Next Steps #
Download Screenshot Studio for Mac, open a project, and connect your assistant. The whole setup takes about two minutes, and the next time you need to rewrite captions or restyle a set, you can do it from the editor you already have open.
Related guides: